
Download and Install TeX Live#
If your network is not ideal, you can use the Quark Netdisk resource I uploaded:
| |
Method 1: Download the Installer#
Visit the TeX Live website. The installers for each platform are:
- Windows:
install-tl-windows.exe(network installer) - Linux:
install-tl-unx.tar.gz(extract it and run theinstall-tlscript) - macOS:
MacTeX-year.pkg(the full MacTeX distribution)
Method 2: Download the ISO Image#
Official ISO download page: https://tug.org/texlive/acquire-iso.html. Click download from a nearby CTAN mirror, then download texlive.iso.
Mirrors#
The following are some CTAN mirrors in China. Open the mirror, click systems → TeX Live; Source/ corresponds to Method 1, and Images/ corresponds to Method 2:
(2) Run the Installer on Windows#
Whether you use the network installer or ISO image, the Windows steps are similar.
- Start the installer:
- ISO/image: after downloading, double-click the ISO or mount it as a virtual drive. Find
install-tl-windows.batin the root directory. - Network installer: run the downloaded
install-tl-windows.exe. - Important: right-click the installer and choose Run as administrator so it can modify the system PATH environment variable.
- ISO/image: after downloading, double-click the ISO or mount it as a virtual drive. Find
- Change mirror source (optional but recommended):
- If you run the
.batfull installer with the Perl/Tk interface, a temporary command window and UI loader will appear first. Wait for the main interface. - In the
.exeinterface, choose a mirror in the screen shown below. Click a mirror under Asia → China, or choose TUNA if unsure.
- If you run the
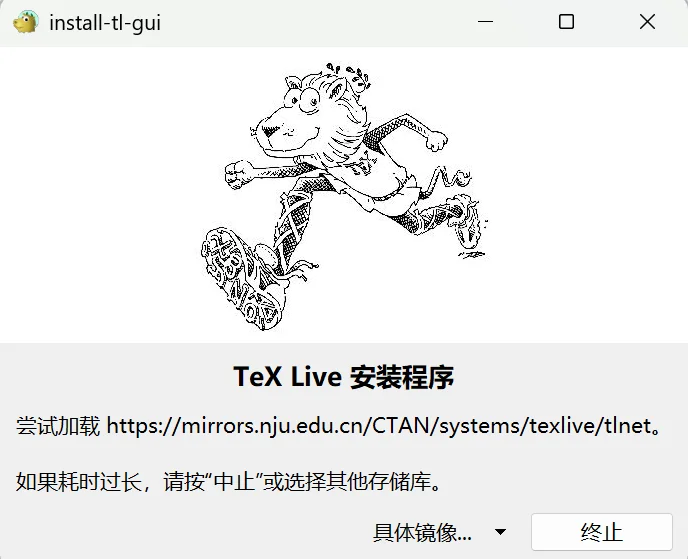
- Configure installation options:
- Install path: the default is
C:\texlive\2025. If C drive space is tight, change it to another drive such asD:\texlive\2025. Avoid Chinese characters or spaces in the path.
- Install path: the default is
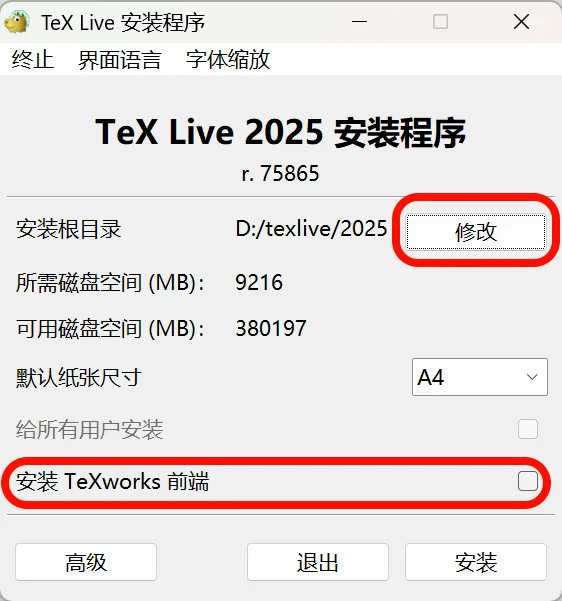
- Front-end component: TeXworks is installed by default. If you plan to use VS Code, uncheck TeXworks front end.
- PATH: newer Windows installers add TeX Live’s
bindirectory to the system PATH by default. Make sure this option is checked. If you forgot it, runtlmgr path addlater as described below.
- Custom installation (advanced):
- If you are unfamiliar with the installer, do not casually change advanced settings under “Directories” or “Options.”
- To save disk space, click “Customize” under “Selections” and keep only “Chinese” and “US and UK English” under the Languages tab.
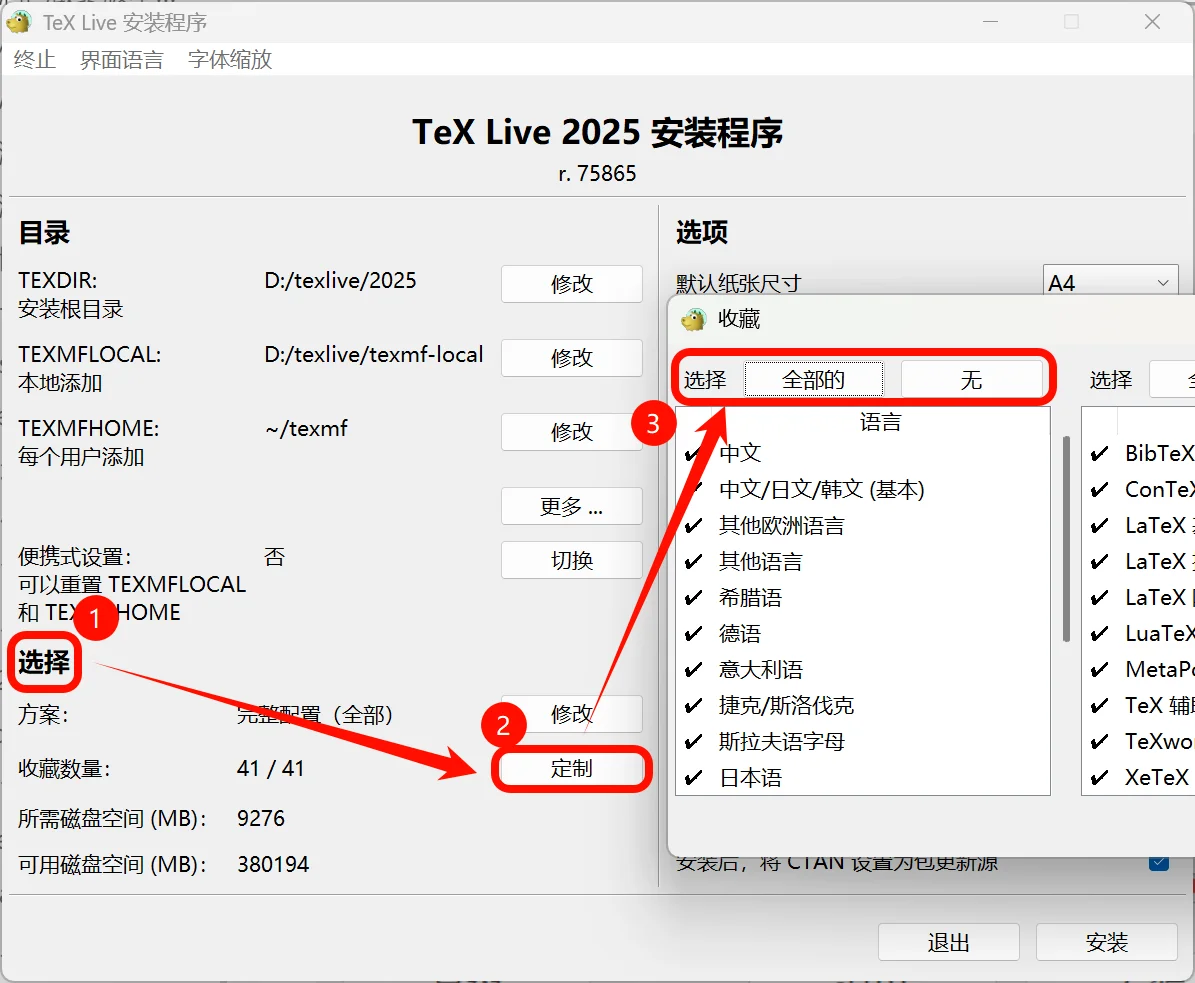
- Start installation by clicking Install. The process downloads many packages from the mirror and may take 30 minutes to several hours depending on network and disk speed.
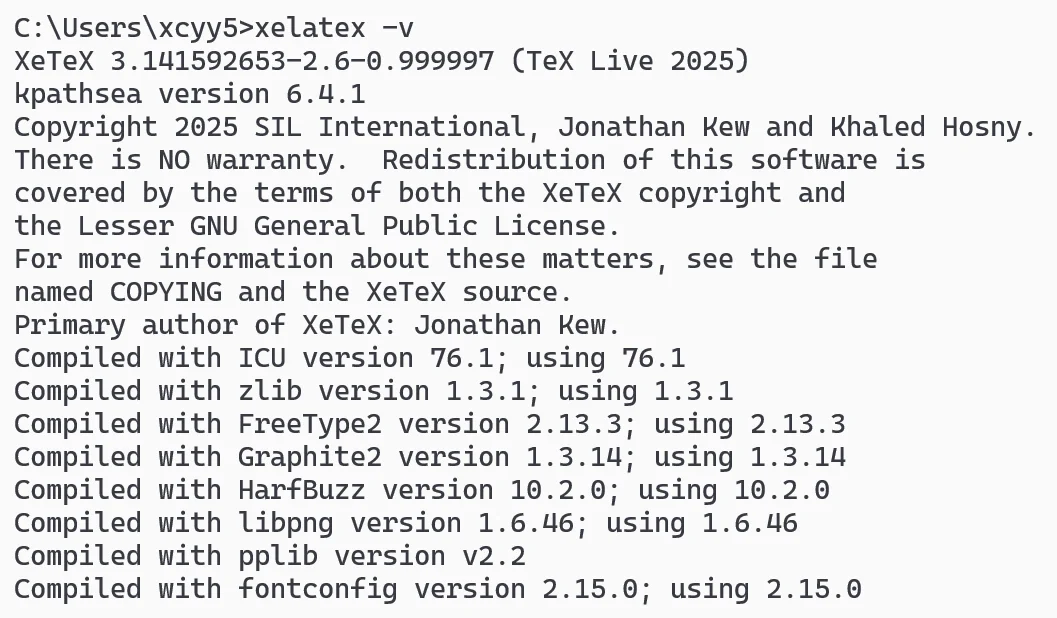
(3) Verify Installation#
Windows (PowerShell)#
| |
- Change or repair PATH
TeX Live provides the
tlmgr pathsubcommand to add or remove system executable path mappings. Example:
| |
This subcommand follows the tlmgr manual.
- Rollback package versions
tlmgrkeeps one backup by default. You can use:
| |
macOS / Linux (bash)#
| |
(4) Manually Configure Windows Environment Variables#
Note: if VS Code cannot preview PDFs or compilation fails, the cause is often an incorrectly configured environment variable. Check and add it manually as follows.
- Open environment-variable settings: right-click This PC, choose Properties > Advanced system settings > Environment Variables, then find
Pathunder System variables and edit it.
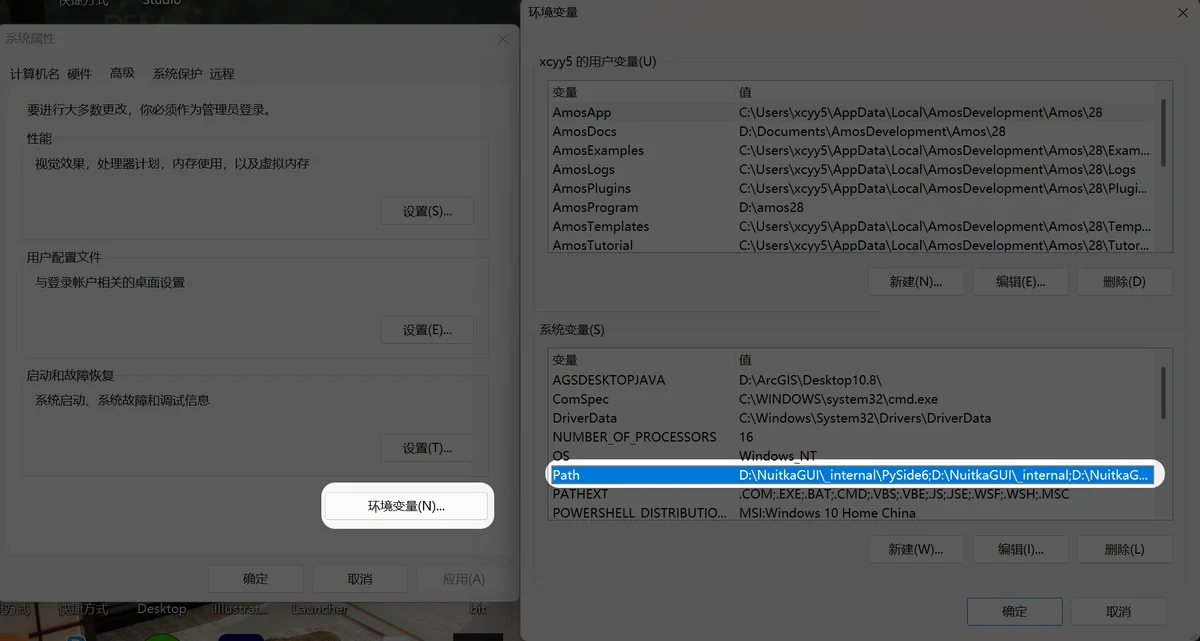
- Verify and add the path: check whether the list already contains the TeX Live install path.
- If missing or wrong: click New and enter the correct path.
- Path requirement: it must point exactly to the
bin\windowsdirectory. - Example:
D:\texlive\2024\bin\windows, adjusted to your actual drive and version.
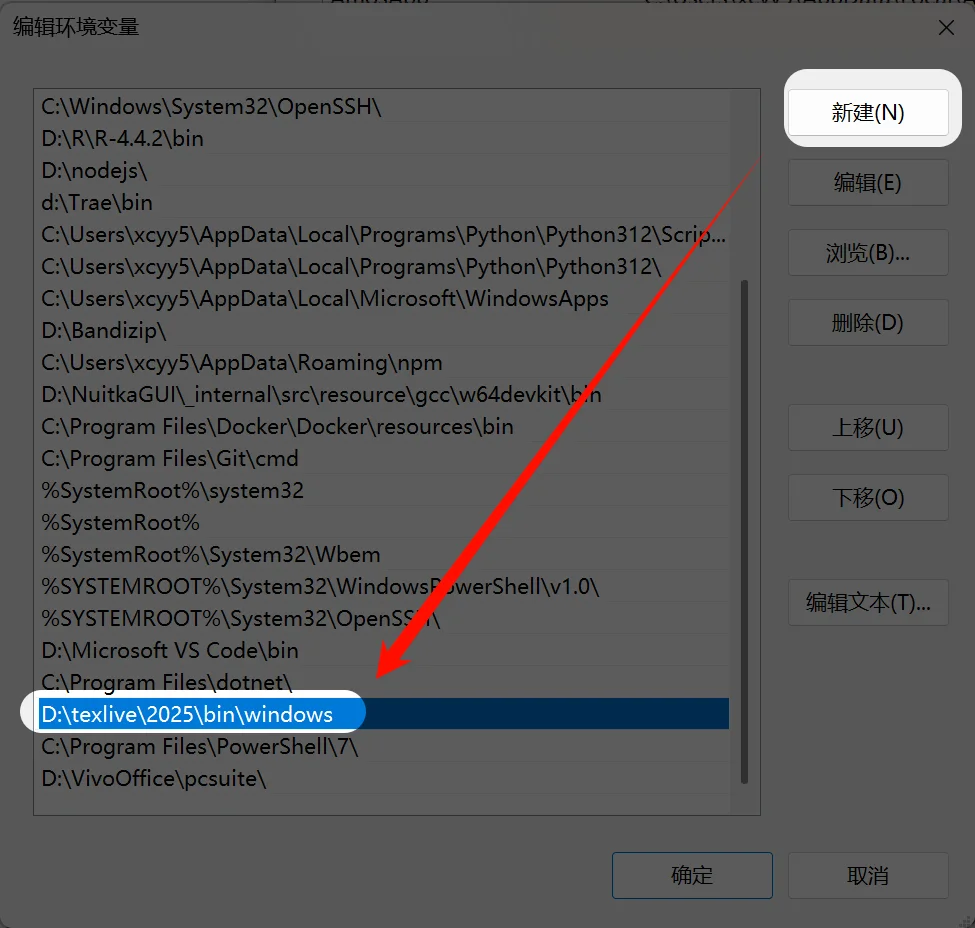
Using LaTeX in VS Code#
Installing TeX Live only provides the underlying engine and packages. We still need a modern editor to write .tex files. VS Code plus the LaTeX Workshop extension is one of the most efficient combinations.
Install VS Code and LaTeX Workshop#
- Download VS Code:
- Official download: https://code.visualstudio.com/Download
- Blog tutorial: VS Code: No More Installation and Configuration Pain
- Install the LaTeX Workshop extension from the Extensions view in VS Code.
Tip: after installation, the
TEXicon appears in the left sidebar only after you open or create a.texfile.
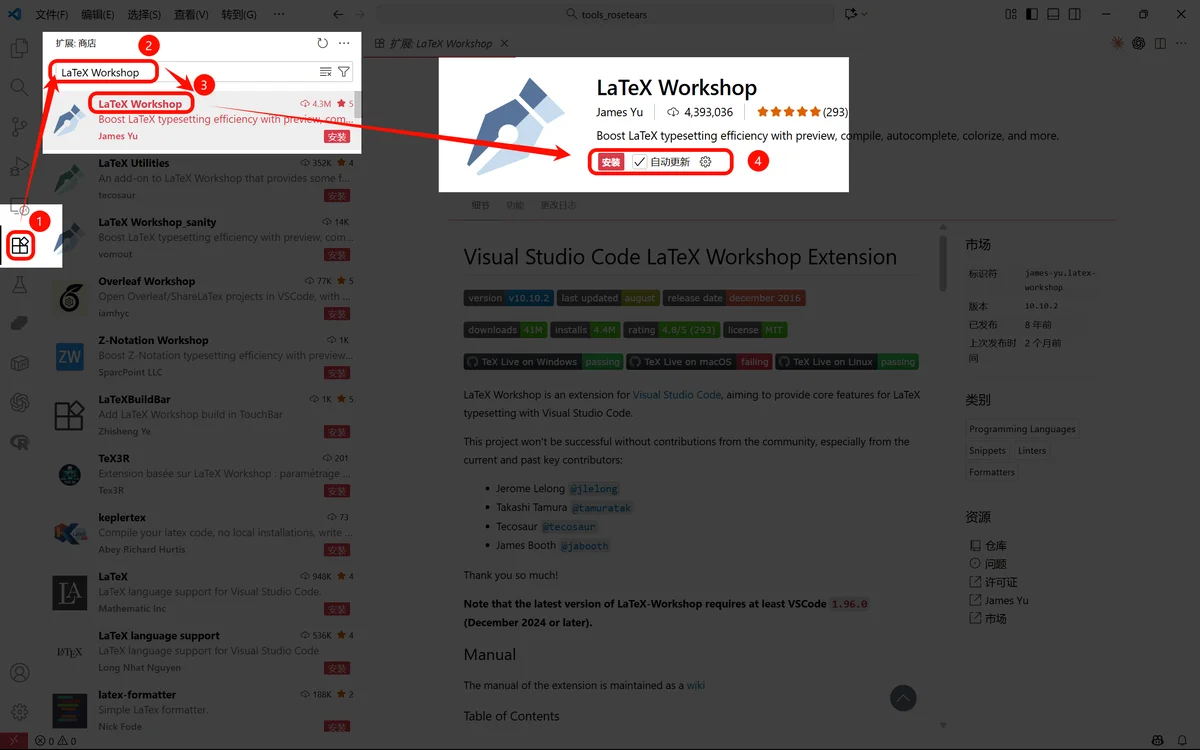
Key Configuration (settings.json)#
For the best experience, especially Chinese support and a clean project directory, configure LaTeX Workshop.
Open settings.json in either of these ways:
- UI:
File → Preferences → Settings, then click the “Open settings.json” icon in the upper right. - Command Palette: press
Ctrl+Shift+Pon Windows/Linux orCmd+Shift+Pon macOS, then choosePreferences: Open User Settings (JSON).
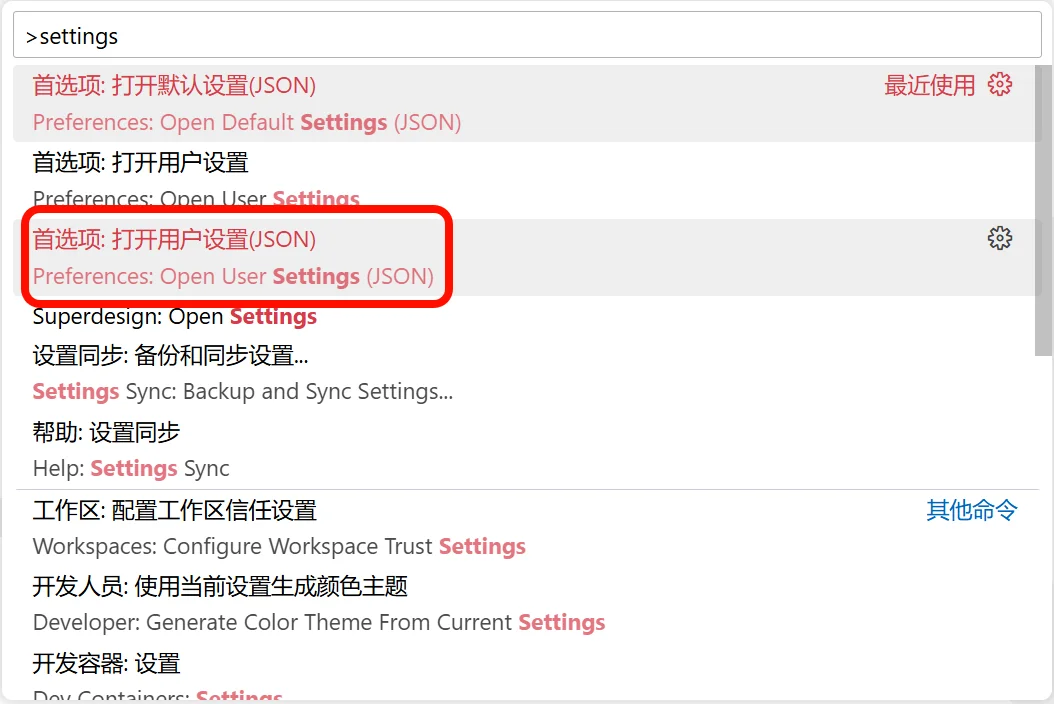
Recommended XeLaTeX-based configuration: append or merge the configuration below into settings.json.
Configuration file
| |
After saving the settings, open a .tex file and build it from the LaTeX Workshop panel.

Minimal Chinese Test File#
Create a file such as main.tex:
| |
Build with XeLaTeX. If the PDF opens in a VS Code tab and Chinese text displays correctly, the basic setup is complete.
SyncTeX Preview#
With the configuration above, double-click the PDF preview to jump back to the corresponding source position. After a build, the preview can also jump to the current source position automatically.
Common Problems#
- If
xelatexis not recognized, check PATH and runtlmgr path add. - If Chinese text is missing, use XeLaTeX and a
ctexclass or package. - If the PDF does not preview, check whether LaTeX Workshop is installed and whether the build output directory is correct.
- If formatting tools fail, install or update
latexindentand its dependencies.
Final Notes#
The simplest reliable route is: install TeX Live or MacTeX, confirm xelatex and tlmgr work in the terminal, install LaTeX Workshop in VS Code, then configure a XeLaTeX recipe. Once this loop works, writing and previewing LaTeX in VS Code becomes much smoother.