首页 / Posts

[PDF2zh 2.0] Three Deployment Guides and Zotero Plugin Configuration

A beginner-friendly guide to configuring PDF2zh 2.0 and the Zotero plugin through Windows .exe, local uv, and Docker deployment, helping you build an efficient research-translation workflow.

Rosetears·
··1830 words·9 mins

Before we begin: make PDF-paper translation less painful
#

Still overwhelmed by dense English PDF papers? PDF2zh 2.0 and its new BabelDOC engine improve layout fidelity and make the translation experience much smoother. This is a beginner-oriented guide for users with little programming experience. We cover three deployment paths:

  1. Lazy path: launch the Windows .exe.
  2. Developer path: create a local Python virtual environment with uv.
  3. Stable path: deploy through Docker.

We also explain how to configure the Zotero-PDF2zh plugin so literature management and translation can work together.

Example environment

  • Windows 11 64-bit
  • Python 3.12.8
  • Docker 28.1.1

Project links:

Video walkthrough: PDF2zh 2.0 deployment and Zotero configuration

Note

The Zotero-pdf2zh method in this article was written for the older 2.4.3 plugin workflow. For the latest workflow, see Zotero-pdf2zh: quickly translate PDFs while preserving layout.


1. Key warnings before deployment
#

Tool overview
#

NameDescriptionHighlightsEnvironment
PDF2zh 2.0 (pdf2zh_next)Standalone research-PDF translation engine with CLI and Web UIPreserves formulas/figures, supports bilingual or translated output, and works with multiple servicesPython 3.10–3.12
Zotero-PDF2zhZotero plugin that calls a local PDF2zh serviceOne-click translation, two-column crop, and translated attachment managementZotero 7
uvRust-based Python package and environment managerVery fast dependency resolution and lightweight virtual environmentsWin / macOS / Linux
Docker DesktopStandard container platformReproducible, isolated, and easy to migrateWindows/macOS/Linux

Compatibility warning: PDF2zh 2.0 (pdf2zh_next) is a new major version and is not compatible with 1.x services. If an old version is installed, uninstall it first with pip show pdf2zh and pip uninstall pdf2zh.

PDFs must contain selectable/copyable text. For scanned PDFs, enable the OCR workaround or auto-enable OCR workaround in the Web UI.


2. Which route should you choose?
#

DimensionRoute A: .exeRoute B: uvRoute C: Docker
DifficultyVery beginner-friendlyNeeds command-line comfortRecommended and stable
IsolationWeakMediumStrong
Resource usageLowLowMedium
Deployment timeSecondsSecondsFirst image pull is slower
ConfigurationGUILocal filesGUI/files
Zotero integrationSupported in newer plugin workflowsSupportedSupported in compose workflows

Author recommendation: use the .exe if you only want the GUI; use uv if you like Python and want local control; use Docker if you want stability and fewer environment surprises.


3. Preparations
#

Prepare Python 3.10–3.12 for local deployment, Zotero 7 for plugin integration, Docker Desktop for container deployment, and an optional API key for higher-quality LLM translation.


4. Route A: Windows .exe
#

Download a pdf2zh-<version>-with-assets-win64.zip package from the PDFMathTranslate-next releases. Prefer the with-assets version because fonts and models are already packaged and first-run failures are less likely. Unzip it, double-click pdf2zh.exe, and open http://[redacted-ip]:7860/ if the browser does not open automatically.


5. Route B: local virtual environment with uv
#

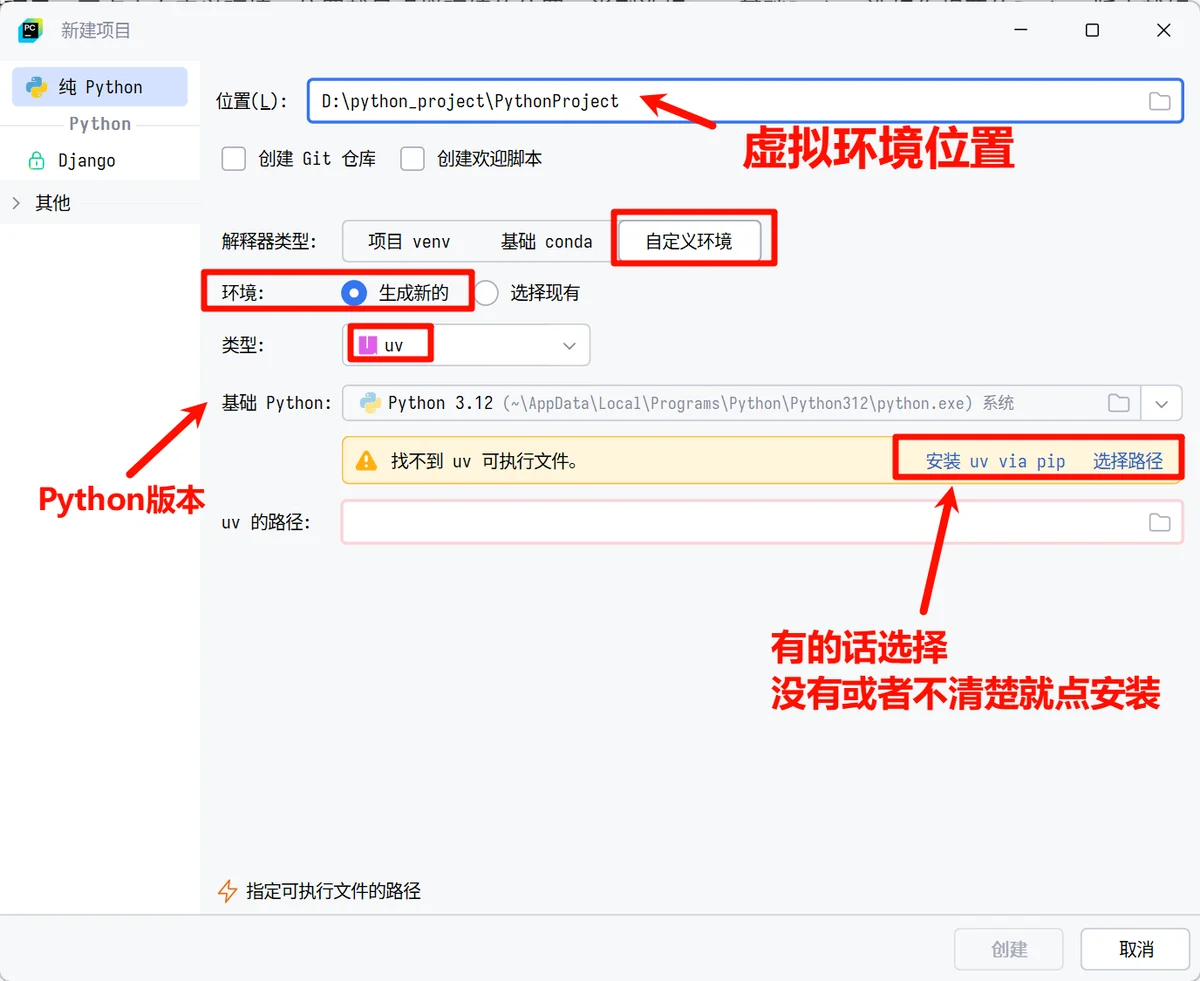
This route creates a clean local Python environment. First install Python and uv, create a project folder, create and activate a virtual environment, then install pdf2zh_next, pypdf, and flask. Use pdf2zh_next --gui for the Web UI, or run CLI translation directly with pdf2zh_next "path/to/paper.pdf".

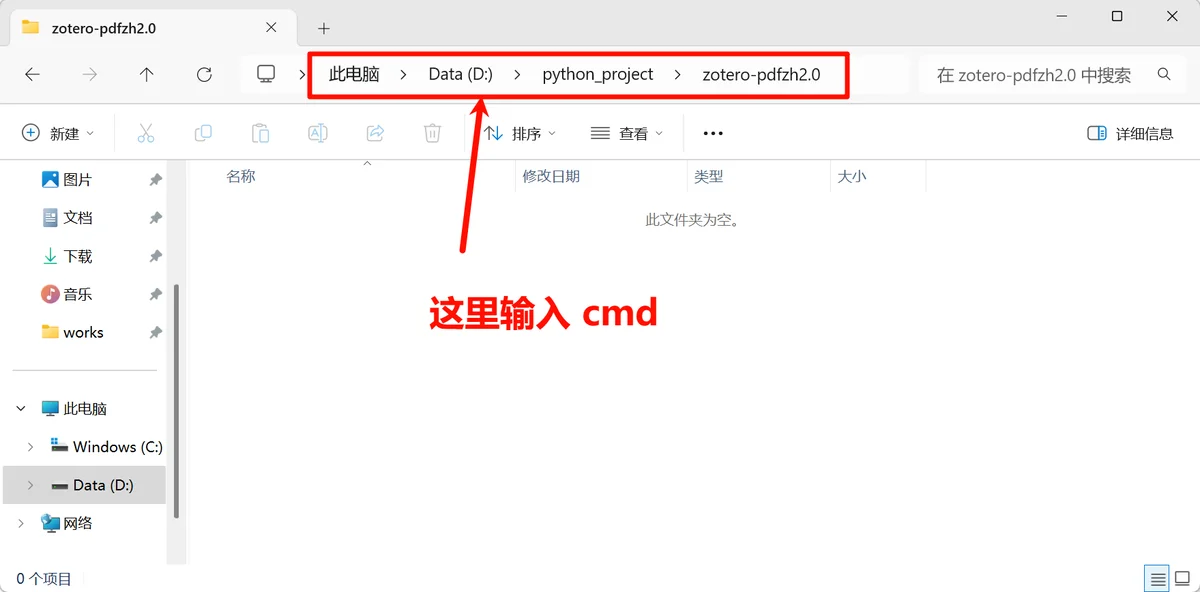
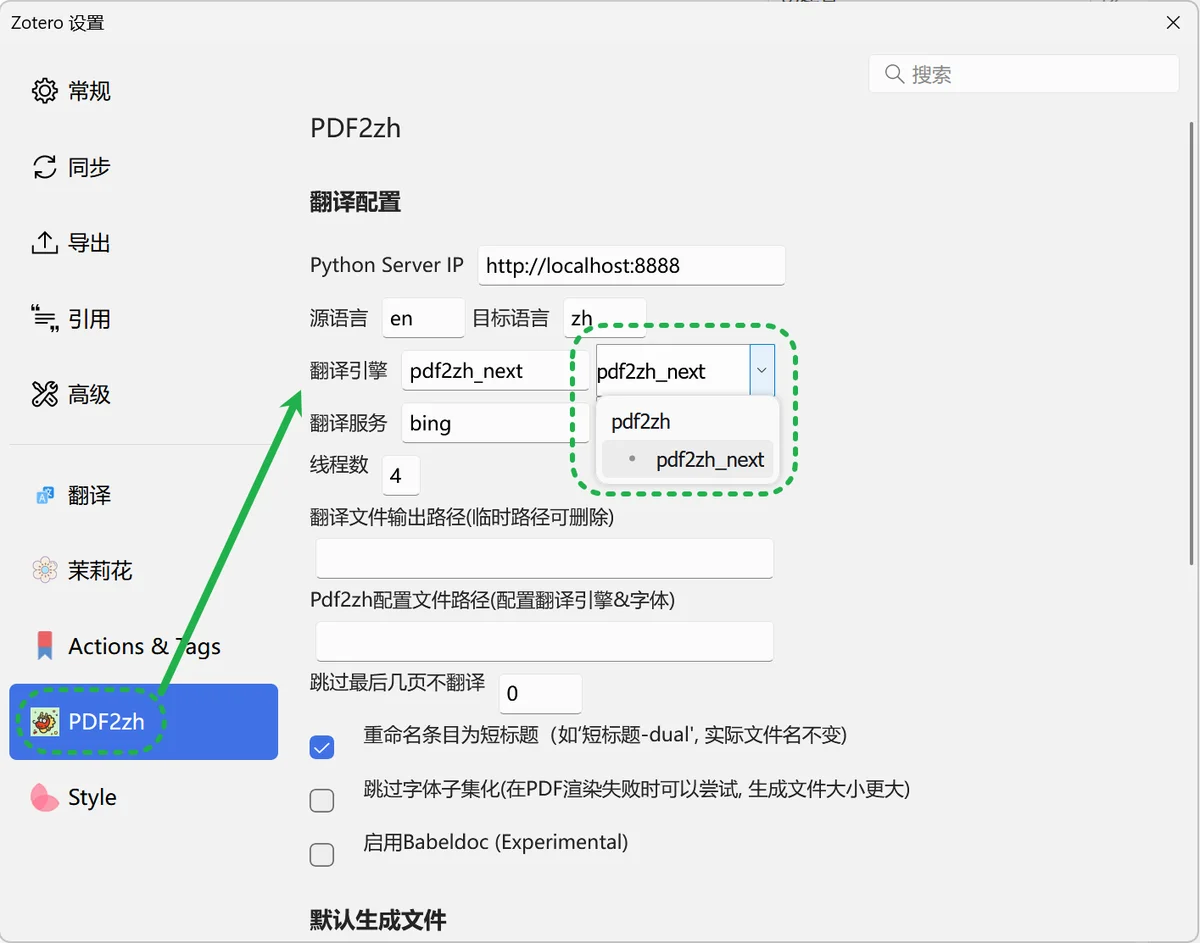
For Zotero integration, install the Zotero-PDF2zh .xpi, prepare server.py, generate config.toml from the PDF2zh Web UI configuration, create a translated/ folder, and run uv run python server.py. In Zotero, set the engine to pdf2zh-next, point the config path to ./config.toml, and set the output directory to ./translated/ or leave it blank.

A one-click startup script can automate project-directory switching, virtual-environment activation, and server startup on Windows or macOS/Linux.


6. Route C: Docker
#

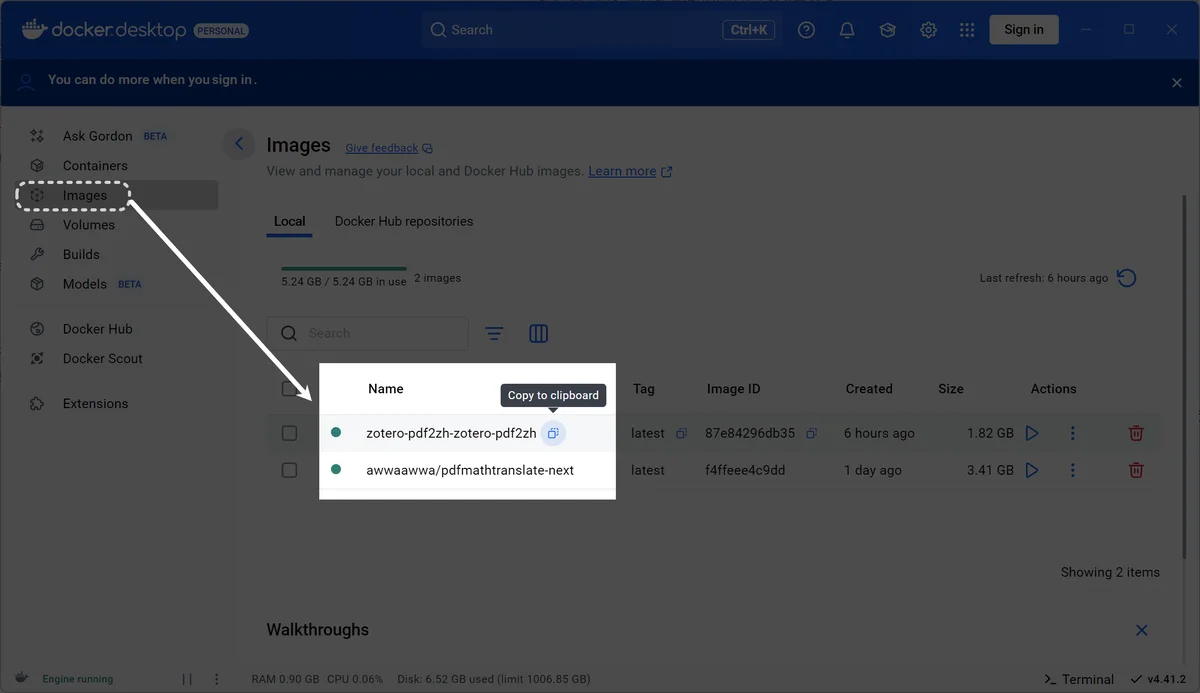
Docker packages the full PDF translation environment into a reproducible container. Install Docker Desktop, verify it with docker -v and docker info, then pull and run awwaawwa/pdfmathtranslate-next. Open http://[redacted-ip]:7860/ to use the Web UI. Use docker start, docker stop, docker logs, docker restart, and docker rm to manage the container.

For Zotero integration, create a Docker Compose project, download the official Dockerfile and docker-compose.yaml, create a persistent zotero-pdf2zh/translated directory, and mount config.toml plus translation outputs into the container. Replace the old base image with awwaawwa/pdfmathtranslate-next:latest when you want the newer 2.x engine.


7. Troubleshooting
#

ScenarioPossible causeFix
Garbled copied PDF textEmbedded fonts or reader compatibilityTry Zotero, Acrobat, or another reader
Port occupied7860 or 8888 is in useFind the process or choose another port
Timeout / 429API rate limitLower concurrency or change API key
Zotero connection failureFirewall or local service not listeningAllow Python/Docker and confirm the host/port
Web UI blankContainer not running or port conflictCheck docker ps and logs
Rich-text placeholder chaosLLM matching errorEnable enhanced compatibility or use a stronger model

Custom prompts add token cost because the same prompt is attached to many translation chunks. If your provider supports KV Cache, the cost is much lower; otherwise disable custom prompts when cost matters.

RPS, QPS, and Zotero “thread count” all refer to the concurrency of requests sent to the upstream LLM. PDF preprocessing is mostly single-threaded, so speed optimization usually means choosing a faster API, improving network quality, and tuning concurrency within provider rate limits.


8. Finish
#

With PDF2zh, language should become a small stream to step over rather than a roadblock in research. I hope this guide helps you avoid pitfalls and translate papers more smoothly. Happy researching!

Screenshots and media
#

图1
Pycharm-uv-setup
zotero-pdf2zh插件设置
镜像名称

Preserved command, configuration, and prompt blocks
#

1
2
3
4
5
6
7
8
>> # 检查是否安装了旧版
>> pip show pdf2zh
>> # 如果有,则卸载
>> pip uninstall pdf2zh
>> ```

```bash
   mkdir zotero-pdf2zh2.0 && cd zotero-pdf2zh2.0 # 在你喜欢的位置创建项目文件夹并进入
 1
 2
 3
 4
 5
 6
 7
 8
 9
10
11
12
13
14
# 步骤一:安装 uv (如果网络通畅,推荐此法)
# 此命令会从官方源下载并执行安装脚本,推荐使用。
powershell -ExecutionPolicy ByPass -c "irm https://astral.sh/uv/install.ps1 | iex"

# 备用方法:如果已安装 Python 和 pip,也可用 pip 安装 uv
# pip install uv

# 步骤二:使用 uv 创建一个名为 .venv 的虚拟环境,并指定使用 Python 3.12
# 编者注:uv 会自动查找你电脑上已安装的 Python 3.12,如果没有则会提示下载。
uv python install 3.12  # 安装3.12版本python
uv venv --python 3.12

# 步骤三:激活(进入)这个虚拟环境,成功后命令行前面会出现 (zotero-pdf2zh2.0) 标志
.\.venv\Scripts\activate
 1
 2
 3
 4
 5
 6
 7
 8
 9
10
11
12
13
14
15
16
# 创建并进入项目文件夹
mkdir -p ~/projects/pdf2zh
cd ~/projects/pdf2zh

# 步骤一:安装 uv
curl -LsSf https://astral.sh/uv/install.sh | sh

# 备用方法:如果已安装 Python 和 pip,也可用 pip 安装 uv
# pip install uv

# 步骤二:创建虚拟环境
uv python install 3.12  # 安装3.12版本python
uv venv --python 3.12

# 步骤三:激活虚拟环境
source .venv/bin/activate
1
2
# 使用 uv 安装 依赖,如果只有Gui需求那么只安装 pdf2zh_next
uv pip install pdf2zh_next pypdf flask
1
2
3
4
5
> uv pip install -U pdf2zh_next
> ```

```bash
pdf2zh_next --gui         # 启动 Web UI 服务,默认监听 7860 端口
1
2
3
# 示例:直接翻译一个位于桌面、文件名带空格的 PDF
# 编者注:带空格的文件路径最好用引号括起来
pdf2zh_next "C:\Users\YourName\Desktop\my test paper.pdf"
 1
 2
 3
 4
 5
 6
 7
 8
 9
10
11
12
13
14
15
16
17
18
19
20
>   pdf2zh example.pdf --pages 1-3
>   ```

```bash
# --- 第 1 步:确保你位于正确的项目目录 ---
cd "/path/to/your/zotero-pdf2zh2.0" # 你的文件夹路径

# --- 第 2 步:下载作为“翻译中介”的 server.py 脚本 ---
# 使用 curl 下载脚本到当前目录,并命名为 server.py
curl -o server.py "https://raw.githubusercontent.com/guaguastandup/zotero-pdf2zh/main/server.py"
# Windows 备用(powershell)
# powershell -command "Invoke-WebRequest -Uri 'https://raw.githubusercontent.com/guaguastandup/zotero-pdf2zh/main/server.py' -OutFile 'server.py'"

# [备用“笨办法”]
# 如果以上命令因网络问题失败,请手动:
# 1. 在浏览器中打开 "https://raw.githubusercontent.com/guaguastandup/zotero-pdf2zh/main/server.py"
# 2. 在打开的页面上右键 -> "另存为...",将文件保存到你刚刚创建的 zotero-pdf2zh2.0 文件夹中。

# --- 第 3 步:创建一个用于存放翻译结果的文件夹 ---
mkdir translated         # 创建名为 translated 的文件夹,用于存放 Zotero 调用后生成的翻译 PDF
1
2
3
4
5
6
7
# 复制生成的 config.v3.toml 到当前目录并重命名为 config.toml
# Windows (cmd):
copy "%USERPROFILE%\.config\pdf2zh\config.v3.toml" config.toml
# Windows (PowerShell):
Copy-Item "$env:USERPROFILE\.config\pdf2zh\config.v3.toml" -Destination "config.toml"
# macOS / Linux:
cp ~/.config/pdf2zh/config.v3.toml ./config.toml
1
2
# 直接用虚拟环境的python解释器运行 server.py
uv run python server.py
1
2
3
4
5
zotero-pdf2zh2.0/
├── .venv/         # uv 创建的虚拟环境
├── config.toml    # 你的翻译配置文件
├── server.py      # Zotero 监听服务脚本
└── translated/    # 存放翻译结果的文件夹
 1
 2
 3
 4
 5
 6
 7
 8
 9
10
11
12
13
14
15
16
17
18
19
20
21
22
23
24
25
26
27
28
29
30
31
32
33
34
35
36
37
38
39
40
41
42
@echo off
rem 设置窗口编码为 UTF-8,防止中文路径或提示语变成乱码
chcp 65001

rem ===【新手必读:请修改这里!】===
rem 下面这行路径需要换成你自己的!
set "PROJECT_PATH=D:\python_project\zotero-pdf2zh2.0"
rem ===【修改结束】===

echo.
echo ========================================================
echo               Zotero 翻译服务一键启动脚本
echo ========================================================
echo.

rem [步骤 1/3] 进入项目目录,若失败则退出
cd /d "%PROJECT_PATH%" >nul 2>&1
if errorlevel 1 (
    echo 错误:无法进入项目目录!请检查 PROJECT_PATH 设置是否正确。
    echo    你的路径设置是: %PROJECT_PATH%
    pause
    exit /b 1
)
echo [步骤 1/3] 已成功进入项目目录: %cd%
echo.

rem [步骤 2/3] 激活 Python 虚拟环境
echo [步骤 2/3] 正在激活 Python 虚拟环境...
call .\.venv\Scripts\activate
echo    - 虚拟环境已激活!
echo.

rem [步骤 3/3] 启动翻译服务
echo [步骤 3/3] 准备启动翻译服务...
uv run python server.py
echo    - 服务已启动!请勿关闭此窗口。
echo.

echo ========================================================
echo.
rem 为了能看到脚本输出,保持窗口开启
pause
 1
 2
 3
 4
 5
 6
 7
 8
 9
10
11
12
13
14
15
16
17
18
19
20
21
22
23
24
25
26
27
28
29
30
31
#!/bin/bash

# ===【新手必读:请修改这里!】===
# 下面这行路径需要换成你自己的!
PROJECT_PATH="/Users/your_username/Documents/zotero-pdf2zh2.0"
# ===【修改结束】===

echo ""
echo "========================================================"
echo "          Zotero 翻译服务一键启动脚本 (macOS/Linux)"
echo "========================================================"
echo ""

# 切换到项目目录,如果失败则会提示并退出
cd "$PROJECT_PATH" || { echo "错误:无法找到项目目录!请检查 PROJECT_PATH 设置是否正确。"; echo "你的路径设置是: $PROJECT_PATH"; exit 1; }

echo "[步骤 1/3] 已成功进入项目目录: $(pwd)"
echo ""

# 激活 Python 虚拟环境
echo "[步骤 2/3] 正在激活 Python 虚拟环境..."
source ./.venv/bin/activate
echo "   - 虚拟环境已激活!"
echo ""

# 运行 Python 服务器
echo "[步骤 3/3] 准备启动翻译服务..."
uv run python server.py
echo "   - 服务已启动!关闭此终端窗口即可终止服务。"
echo ""
echo "========================================================"
 1
 2
 3
 4
 5
 6
 7
 8
 9
10
11
12
     chmod +x start_server.sh
     ```

```Bash
     ./start_server.sh
     ```

```bash
# 验证版本,能看到版本号即可,如:Docker version 28.1.1, build 4eba377
docker -v
# 查看 Docker 运行信息,若无报错,说明 Docker 引擎已就绪
docker info
1
docker pull awwaawwa/pdfmathtranslate-next:latest
1
docker pull ghcr.io/pdfmathtranslate/pdfmathtranslate-next:latest
1
2
# 示例:使用 dislabaiot.xyz 源 (请将此地址替换为你信任的、可用的加速器地址)
docker pull dislabaiot.xyz/awwaawwa/pdfmathtranslate-next:latest
1
docker run -d --name pdf2zh -p 7860:7860 awwaawwa/pdfmathtranslate-next
1
   docker pull hub.xdark.top/awwaawwa/pdfmathtranslate-next:latest
1
   docker run -d --name pdf2zh -p 7860:7860 hub.xdark.top/awwaawwa/pdfmathtranslate-next:latest
 1
 2
 3
 4
 5
 6
 7
 8
 9
10
11
12
13
14
15
16
17
18
19
# 1) 创建一个总工作目录,并立刻进入
#    我们所有的操作都将在此目录下进行
mkdir zotero-pdf2zh-docker && cd zotero-pdf2zh-docker

# 2) 从 zotero-pdf2zh 官方 GitHub 仓库下载配置文件
#    - Dockerfile: 定义了如何构建我们服务的镜像
#    - docker-compose.yaml: 定义了如何运行和编排我们的服务
curl -o Dockerfile https://raw.githubusercontent.com/guaguastandup/zotero-pdf2zh/main/Dockerfile
curl -o docker-compose.yaml https://raw.githubusercontent.com/guaguastandup/zotero-pdf2zh/main/docker-compose.yaml

# 3) 创建一个子目录,专门用于存放需要持久化的数据
#    这包括你的个人配置和翻译后的文件
mkdir zotero-pdf2zh && cd zotero-pdf2zh

# 4) 在数据目录内,预先创建用于存放翻译结果的文件夹
mkdir translated

# 5) 操作完成后,返回到项目根目录,为下一步做准备
cd ..
 1
 2
 3
 4
 5
 6
 7
 8
 9
10
11
12
13
14
15
16
17
18
19
20
21
22
23
24
services:
  zotero-pdf2zh:
    build:
      context: .
      dockerfile: Dockerfile
      args:
        # 编者注:我们在这里指定了构建时使用的基础镜像。
        # 相比原始的 byaidu/pdf2zh,awwaawwa/pdfmathtranslate-next 更新更频繁,功能更强。
        - ZOTERO_PDF2ZH_FROM_IMAGE=awwaawwa/pdfmathtranslate-next:latest
        - ZOTERO_PDF2ZH_SERVER_FILE_DOWNLOAD_URL=https://raw.githubusercontent.com/guaguastandup/zotero-pdf2zh/refs/heads/main/server.py
    container_name: zotero-pdf2zh
    # restart: unless-stopped 是一条黄金法则,
    # 它能确保 Docker 服务在宿主机重启后自动恢复,实现“开机自启”。
    restart: unless-stopped
    ports:
      - "8888:8888" # 将容器的 8888 端口映射到你电脑的 8888 端口
    environment:
      - TZ=Asia/Shanghai # 设置时区,确保日志时间正确
      - HF_ENDPOINT=https://hf-mirror.com # 使用 HuggingFace 镜像,加速模型下载
    volumes:
      # 这是实现持久化的关键:将我们创建的本地目录映射到容器内部
      - ./zotero-pdf2zh/translated:/app/translated     # 挂载翻译结果目录
      - ./zotero-pdf2zh/config.json:/app/config.json     # (可选) 兼容旧版 JSON 配置 1.x 配置文件
      - ./zotero-pdf2zh/config.toml:/app/config.toml     # 核心!Zotero 读取的新版 TOML 配置文件 2.x 配置文件
1
2
3
4
5
6
# Windows (cmd)
copy "%USERPROFILE%\.config\pdf2zh\config.v3.toml" zotero-pdf2zh\config.toml
# PowerShell
Copy-Item "$env:USERPROFILE\.config\pdf2zh\config.v3.toml" zotero-pdf2zh\config.toml
# macOS / Linux
cp ~/.config/pdf2zh/config.v3.toml zotero-pdf2zh/config.toml
1
2
3
4
5
6
zotero-pdf2zh-docker/
├── Dockerfile
├── docker-compose.yaml
└── zotero-pdf2zh/
    ├── config.toml      <-- 你的 API Key 和配置在这里
    └── translated/      <-- 翻译后的文件将出现在这里
1
2
3
4
5
6
7
# 推荐:先清理可能存在的同名旧容器,避免冲突 (|| true 会忽略容器不存在的错误)
docker rm -f zotero-pdf2zh || true

# 一键构建镜像并在后台启动服务
# --build: 强制根据 Dockerfile 重新构建镜像,以应用我们的修改
# -d:      detached 模式,让服务在后台安静运行
docker-compose up -d --build

Related tools

Related